45th Annual Meeting – Research and Technical Studies Program, June 1, “What Can Nanotechnology Do for Us? Evaluating novel cleaning tools through the NanoRestArt project at Tate” by Dr. Lora Angelova, Rachel Barker, Bronwyn Ormsby, and Gates Sofer

The NanoRestArt project is a multinational network of conservators, scientists, and industry partners working to develop and test novel nanotechnology-based materials intended for the conservation and preservation of modern and contemporary cultural heritage. Funded by an EU Framework Programme for Research and Innovation Horizon 2020 grant, the project consists of 27 partners, most of which reside in the European Union. The research and development process for these tools is divided into four major categories: gels and nanostructured fluids for cleaning, nanocontainers and nanoparticles for surface protection and strengthening, sensors for molecular detection, and environmental impact of the new materials. As a partner in NanoRestArt, the Tate is investigating the development and evaluation of cleaning systems in collaboration with the Research Center for Colloids and Nanoscience (CSGI), who developed the nano-structured cleaning agents.

Dr. Angelova’s discussion of her work with the Tate and the NanoRestArt project focused on testing nano-structured cleaning systems, investigating their effects on Michael Dillon’s Op Structure sculptures and on mock-ups intended to replicate the properties of the artwork. Chemical analysis of one Op Structure sculpture revealed that it is made entirely of poly(methyl methacrylate), or PMMA, and adhered with PMMA cement. It is an excellent candidate for the NanoRestArt evaluation process because it is composed of a synthetic polymer material which cannot be easily treated with conventional conservation techniques and can benefit from wet surface cleaning. The plastic structure is in very good condition but does show evidence of dust accumulation and surface soiling from handling as well as adhesive labels in need of removal.

Op Structure by Michael Dillon. Image courtesy of http://www.tate.org.uk

The mock-up samples were created by treating a series of semi-opaque acrylic polymer sheets with a variety of soiling materials to mimic finger grease, dirt, and adhesive labels, also including some un-soiled control surfaces. In addition, a range of materials were used to clean the samples including the novel NanoRestArt gels created by CSGI as well as typical cleaning agents used by conservators. PMMA is a highly glossy material which is easily scratched by surface wiping and dissolved by many common solvents. The NanoRestArt gels were therefore chosen as appropriate cleaning materials to avoid such issues during cleaning, and can be loaded with a variety of fluids for cleaning purposes.

The evaluation process involved treating each soiled and control mock-up sample surface in triplicate using each cleaning method, and evaluating the results using a Hirox microscope, gloss meter, colorimeter, and infrared spectrometer. Conservators rated each cleaning agent based on its ease of use, health and safety characteristics, control, soil removal effectiveness, tendency to leave residues, and gloss change using a number system. After treating the mock-up samples, the Tate research team found that to the naked eye, simple cleaning solutions (such as saliva or deionized water) worked well to remove the soil, but left scratches and streaks when viewed under the microscope. Additionally, soiled surfaces cleaned with gels showed evidence of gel residues and microdroplets as the sample surfaces are non-absorbant. The best cleaning results derived from a microcloth moistened with a combination of a surfactant and a chelator known as triammonium citrate. For the adhesive labels, some microemulsion cleaning agents were successful in removing them from mock-up samples. Dr. Angelova mentioned that they were not able to load the microemulsions into the NanoRestArt gels, but this would probably be an ideal cleaning solution.

Mock-up samples used to test cleaning procedures. Image courtesy of http://www.tate.org.uk

When working with the actual Op Structure sculptures, conservators chose to clean a small, inconspicuous soiled area, beginning with water and working up to the surfactant and chelator solution – a process which effectively removed dirt without scratching the surface. Based on the mock-up tests, conservators were able to successfully remove adhesive labels from the artwork using a solution of water and isopropyl alcohol.

45th Annual Meeting – Photographic Materials Session, May 30, “Moonlight and Midnight: The evolution of Edward Steichen’s ‘Moonrise’ prints” by Kaslyne O’Connor, Ariel Pate, and Sylvie Pénichon

This talk was a good example of collaborative art historical and material science research. Two of the three authors, Kaslyne O’Connor and Ariel Pate, discussed a study that revolved around two gum-platinum prints by Edward Steichen from his 1904 “Moonrise” series in the collection of the Art Institute of Chicago that had titles and dates under question. Each print had been referred to by different names (“Midnight Lake George” and “Moonlight Lake George“), and varied in tonality and surface sheen (you will notice that the prints have the same titles and dates on the Art Institute of Chicago website). Furthermore, the image in one of the prints is flipped horizontally.

A letter from Steichen to Stieglitz talks about “Midnight Lake George” being a platinum print followed by blue print, then greenish gum varnish. This letter is a valuable piece of information, along with X-Ray Fluorescence and Fourier Transform Infrared Spectroscopy that gave characteristic signals for Prussian blue, platinum (“Midnight…” had more), palladium, mercury (traces in “Midnight…” only), chromium, iron (“Moonlight…” had more), and lead for both prints. Still to be determined is the distribution of Prussian blue throughout the print, which would suggest the cyanotype process vs. a Prussian blue watercolor wash over the entire surface of the print. Clip marks at the print edges did displace the gum layer, thus revealing a blue layer below, which could be a hint that the cyanotype process was used. Examination of “Midnight…” under ultraviolet light exhibited a green fluorescents characteristic of linseed oil.

A Camera Works supplement from 1906 refers to “Moonlight…”. A 1910 Albright Art Gallery catalog for the “International Exhibition of Pictorial Photography” refers to “Moonlight…” having been made using a platinum gum process “peculiarly [Steichen’s] own”. Ultimately, a timeline was proposed by the authors using the information gathered from this research, which supports the 1904 (“Midnight…”) and 1909 (“Moonlight…”) printing dates for each. More apt titles were also proposed–”Road to the Valley, Moonrise” for “Midnight…” and “Road to the Valley, Moonrise Lake George” for “Moonlight”. Something that was noted that I found to be particularly interesting was that Steichen became less “poetic” in his later years, and retitled many of his prints.

Also to note, this project was born out of a previous project to create the website The Alfred Stieglitz Collection, a rich resource recommended to visit.

45th Annual Meeting – Research & Technical Studies, June 1, “Stability of Polyvinyl Butyral Polymers with Light Exposure” by David Thomas, Matthew Clarke, and Blythe McCarthy

Art from the Kizil Caves at the Smithsonian Freer Gallery of Art and Arthur M. Sackler Gallery

David Thomas and I could be career siblings. We both have technical backgrounds in materials and polymer science. We both spent time in industry. And this the first time for both of us at an annual AIC meeting. Add in my pre-conservation R&D work on adhesives and the photochemical reactions of polymers, and it’s not surprising that I was chomping at the bit to hear his talk “Stability of Polyvinyl Butyral Polymers with Light Exposure”.

David explained how he, Matthew Clarke, and Blythe McCarthy were looking at the possibility of using polyvinyl butyral (PVB) as an adhesive material for use in consolidating fragments of wall paintings from the Kizil Cave Complex in Xinjiang Province, China. These wall paintings are generally matte in appearance and are comprised of gypsum on mud plaster support. More specifically, sixteen fragile fragments had been leant to the Freer Gallery from the Smithsonian American Art Museum.

PVB was identified as a potential match to the consolidation needs of the wall painting fragments for a few reasons. It darkens to a matte surface comparable or better than similar materials, it is easily applied and removed using ethanol, and it has been shown to be an effective consolidant for wood and bone materials. This left the question: how does PVB age under light exposure?

Photo-aging of PVB might sound familiar. David pointed out that Robert Feller published results on the photodegradation of PVB materials in 2007 (http://www.sciencedirect.com/science/article/pii/S0141391005005057), digging into the chemical mechanisms of PVB degradation. The goal here, David emphasized, was not to look at the degradation mechanism itself but to investigate a more practical comparison of similar consolidation materials in actual use.

I found David at his most compelling when digging into the compositions and manufacturers of various grades of PVB. The types of PVB available vary primarily in their relative amounts of butyral, alcohol, and acetate content, a consequence of the polymer manufacturing process. He had a clear wealth of knowledge to offer here, and I wish he had presented even more (but that might just be the polymer scientist in me, your mileage may vary).

David and coworkers cast test films of a number of these grades of PVB, as well as control films of pure polyvinyl acetate (the industrial PVB precursor) and the ubiquitous Acryloid B-72 acrylic polymer, which were all then exposed to UVA (long wavelength UV) irradiation. At the same time, coworkers aged the same films by exposure to a weatherometer’s Xe lamp at the National Gallery of Art. They then tracked changes in color, mass loss, and IR spectra.

Trends in weight loss during aging of the films seemed to correspond with the polyvinyl alcohol content of the PVB: more alcohol led to more weight loss (ie, Mowital B30H degraded more quickly than Butvar B-98). The controls of B-72 and polyvinyl acetate showed no weight loss, and no appreciable discoloration. And by using a fiber optic-coupled FTIR to track the C=O carbonyl signal, an indicator of light-induced oxidative degradation, David showed that indeed the most rapidly degrading B30H showed increased C=O during aging compared to B-98, while the stable B-72 showed comparatively little C=O change and thus less degradation. In all cases, light-exposed PVB could be easily removed with ethanol, showing that no cross-linking reactions were occurring.

Comparison of chemistry induced by light sources as different as a weatherometer’s Xe arc lamp and comparatively narrow-band UVA lamp is a delicate affair. So I was disappointed that the talk did not include how the team evaluated light irradiance and dosage. It begs the question of how much photo-chemical energy was actually imparted to each sample. This also begged the question of heat. A Xe arc lamp in a small weatherometer chamber could reasonably be expected to induce a significant amount of heating compared to UVA bulbs. As David highlighted the comparatively high temperatures of Feller’s prior PVB work compared to the work presented here, it makes it difficult to determine how similar or different these varied results might be.

The data showing PVB applied and aged on Plaster of Paris mock-up materials looked promising. David offered some reasonable guesses as to why PVB might be more promising in real object application than on thin films. For example, more opaque materials would shield PVB from full light exposure by acting as a competitive absorber. And the color changes in PVB could be relatively minor compared to the colors of the treated object.

I still would have loved to have seen more about how closely the thin films and mock-ups behaved and had time to ask some of my more nagging questions about light and heat levels.

There are a few broader take-aways from David’s talk that I know I will be keeping in mind for myself:

  • It never hurts to take an extra look at the sourcing and composition of “trade name” products. As vague as they might be, a product’s MSDS/SDS could provide a useful starting point to sleuth out the components in new products or find changes in existing ones.
  • Mindfulness in equipment specs are crucial for useful comparisons of test cases. Perhaps even more crucial is carefully reporting those specs to simplify and aid others in their own comparisons.
  • Don’t take old studies at simple face value. David made a good case for trying them again closer to home and closer to your specific application of interest. You never know what you might find.

45th Annual Meeting, Book and Paper + RATS Session, May 31: “Contacts that Leave Traces: Investigations into the Contamination of Paper Surfaces from Handling,” by Karen van der Pal

In libraries, archives, and museums around the world, those in charge of protecting cultural heritage struggle with the topic: Gloves or No Gloves? Karin van der Pal’s talk on the contamination of paper surfaces from handling gives measurable data pertaining to the debate.

Van der Pal’s studies in forensic analysis are being conducted at Curtin University in Western Australia. She is currently collaborating with the Indianapolis Museum of Art on the chemistry of latent fingerprints and with Flinders University, in South Australia.

Van der Pal received paper samples from an Australian paper mill to conduct her research. She first solidified her own approach on how to not contaminate the papers she was testing: wearing cotton gloves underneath nitrile gloves she could take off the top layer and replace with a new set of gloves during the process without any of her marks coming through.

Historically, we know that dark fingerprints appear on paper. The edges of leaves in books become discolored as well. But is this a result of dirt, or could it be because of fingerprint oils? Van der Pal explained that the residue left by fingermarks include aqueous deposits, lipids, and dead skin. The proportion varies based on a person’s age, gender, and diet. Another variable on the kind of mark that is left is environmental exposure. If the pages with the contamination are left in the dark, there is little discoloration, but exposure to light causes the marks to darken.

Fingerprint deposits can be a combination of sebaceous oils and sweat from ecrine and apocrine glands. Typically, van der Pal explains that when a finger print is left, the oily sebaceous residue is on top, while amino acids sink into the paper, and the oil residue evaporates. In van der Pal’s experiments, the fingerprints are not visible to the naked eye, so it was necessary to apply an indicator agent that could show the intensity/saturation of the print left on her test papers. Ninhydrin has historically been used, that develops a fingerprint into a pink-purple. 1,2-Indandione/Zn Chloride exhibits color and luminescence and can show marks left up to 150 years old, so van der Pal selected this to use as an indicator.

The goal of the speaker’s most current experiments was to determine how effective hand washing is, if contaminants pass through gloves, and what effect hand gels and sanitizers have on papers. Using the 1,2 Indandione/Zn Chloride, van der Pal was able to determine that no contaminants come through nitrile gloves up to 2 hours. She cautioned that fingerprints and oils can still be picked up onto the outside of the nitrile gloves if one handles doorknobs and keyboards, for example. One also has to be mindful that wearing nitrile gloves for an extended amount of time is very unpleasant, so an option could be to wear cotton gloves underneath.

Van der Pal’s experiments show that 5 minutes after handwashing, the oils in the skin come back, and that 15 minutes after washing, there is more oil than prior to washing because the body is working to redevelop the oil lost.

Hand creams are left on the surface of the paper.

Antibacterial gels also do not prevent oils from being left on paper.

In the future van der Pal expects to study how drying/aging affects a wider range of paper, how long the fingermarks last on the paper, and what effects whether the marks darken.

Questions from the Floor:

Q1: Can you still detect marks on paper that have been washed? A1: Yes, you can still detect marks on paper that has been subsequently washed up to 3 months.

Q2: Regarding gels, how long did you wait until you tried to detect the oils? A2: we tested at different intervals of time.

Q3: Was there a transfer of the materials/paper to the gloves? A1: Reusing gloves can cause a transfer. Some gilding can attach to cotton gloves. Nitrile shouldn’t pick much up.

45th Annual Meeting – Research and Technical Studies Session, June 1, ” Early Intervention for At-Risk 21st Century Fugitive Media” by Fenella France

Dr. Fenella France touched on many questions near and dear to any conservation scientist’s heart, including my own, during her talk at the Research and Technical Studies session on Thursday morning. 1) How can effectively controlling environmental parameters reduce the need for invasive intervention? 2) What is the nature and impact of the interaction between media and substrate and 3) How can our findings, as scientists, impact the production of artists’ materials? Continue reading “45th Annual Meeting – Research and Technical Studies Session, June 1, ” Early Intervention for At-Risk 21st Century Fugitive Media” by Fenella France”

Call for materials to be tested at The Met

The Metropolitan Museum of Art’s (The Met) Department of Scientific Research is embarking on an Institute of Museum and Library Services funded project to evaluate a wide variety of commonly used conservation, storage, shipping, and building supplies that are readily available and used in North America.  The goal is to determine the appropriateness of those materials for use near or in contact with cultural heritage objects, including natural history specimens. All results and data will be made publically available at no cost online.

We are currently seeking lists of the materials used by museums, libraries, archives, private conservators, collections managers, or anyone whose main business is the preservation, exhibition, transport, or handling of cultural heritage and natural history collections.  After collating and selecting a broad range of the most widely used and promising materials, we will conduct both the Oddy test and a chemical analysis of volatiles for each material.

If you are willing and interested in sharing information about materials used in your practice of preserving, displaying, storing, or shipping objects, please reply to to Eric.Breitung@metmuseum.org.  The call for materials will be ongoing throughout the project, however, the main selection of materials for testing will occur by August 2017.  Those interested in contributing will be sent a basic spreadsheet where information such as make, model, supplier, and material type can be recorded.  Kindly note that we will select materials for testing based on this call; even if you utilize only a handful of materials, please consider contributing.

44th Annual Meeting – Research and Technical Studies, May 17, "Binders and pigments used in traditional Aboriginal bark paintings” by Narayan Khandekar

This was the last talk I saw at the meeting and was a perfect way to wrap things up, with a travelogue-slash-fascinating research project on the materials and techniques of Aboriginal paintings from the northern part of Australia. Narayan traveled to various art centers and museums to look at and sample pre-1960s paintings, talk to artists and gather local materials. He took about 200 samples from 50 paintings (including some from Harvard’s collection), the oldest from circa 1878. He also obtained materials from artists working today, some of whom took him around to gather materials from local sources, including the beaches of Bathurst Island (part of the Tiwi Islands off the coast of the Northern Territories – thanks Google Maps!). Back at Harvard, he and his colleagues (co authors were Katherine Eremin, Daniel P. Kirby & Georgina Rayner) gathered information on pigments, binders and other materials present that may indicate previous treatments. Narayan pointed out that only two samples of similar paintings had been analyzed and published before, such that this study presents entirely new information.

Australia map

Of particular interest was the investigation into possible binders. Oral histories and documentary evidence recorded various possible binders, including turtle eggs and orchid mucilage, but it was generally thought that paintings made before the arrival of missionaries in the 1920s didn’t have binders at all (a similar question has been on my mind regarding the paintings made in the Sepik River region of Papua New Guinea). Binders were present in 77% of the samples analyzed. No proteins, waxes, fats or blood were detected. The analysis of the oldest paintings did reveal the presence of orchid juice, confirming that binders were in use that early. The techniques of using orchid mucilage could vary; the sticky juice could be mixed with the pigment, or laid down first before applying the pigments mixed in water.
As expected the pigments were largely ochres, and Narayan noted that the trace elements present in the samples provide a fingerprint that can in theory be used to begin to trace the occurrence of different ochres in different areas, but that more study and sampling is necessary to pursue this.

Colorful ochres on the beach

Other interesting findings included the use of dry cell batteries as a source for black manganese and zinc pigments on paintings from Groote Eylandt (yes a very great big island off the east coast of the Northern Territories); this area also shows the use of natural manganese-rich ores and charcoal for black pigments. A curious silver oil-resin paint on two paintings from the 1920s turned out to correlate with the roof repainting of a nearby lighthouse at the same time. The presence of DMP (dimethyl phthalate) in some paintings prior to 1957 resulted from the liberal use of insect repellent (FYI this is the main ingredient in Avon’s Skin-so-Soft; it fell out of use when DEET was invented). The presence of nitrocellulose on Groote Eylandt paintings was connected to records from the 1948 expedition suggesting that they had been consolidated with Duco.
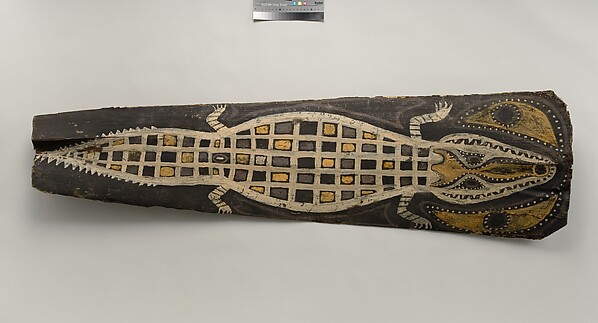
As always, research continues, and Narayan mentioned that they would be looking further into the use of gums and of bloodwood, though I didn’t get down any details on that (I hadn’t actually planned to blog the talk, so apologies for any lacunae!). Also, I’m pretty sure there was a crocodile sighting mentioned, but that too didn’t make it into my notes, so here’s one of my favorites for good measure…

44th Annual Meeting, Paintings Session, May 17, 2016, “Experimental study on merits of virtual cleaning of paintings with aged varnish” by Giorgio Trumpy and John K. Delaney

 
Giorgio Trumpy presented interesting work he has been conducting on the “virtual cleaning” of paintings at the National Gallery, Washington, D.C. as a post-doc with John Delaney. He described a mathematical/- computer model which is being developed to predict and represent what a painting would look like after the removal of a yellowed varnish. The idea is not to replace the conservator, but to provide a tool in helping conservators visualize the results of such a treatment.

GIF_VanHuysum_animated
Click on the animated .gif image to see the difference in before, virtual cleaning, and real cleaning (after).

The model makes use of the contribution of the scattering (diffuse reflectance) of light from the surface of a painting with and without an aged varnished, after application of a fresh varnish, and from the interface of the paint layer and the varnish surface itself. Measurements were made on two paintings to obtain values for use in the model, and the optics of the yellowed varnish itself was estimated by measuring the transmittance through a solvent containing the dissolved yellow varnish.
The results give a pretty good indication of what the painting might look like after removal of the vanish. Click on the image* to see the animated .gif (it worked on my computer). There are differences with the paintings however as can be seen comparing the virtual cleaning image and the after (real) cleaning image. Trumpy thinks that the differences are due, among others, to the fact that the model does not account for local variations in varnish thickness or aging, and the use of the transmittance values for the yellow varnish as measured through the solvent.
In a follow-up e-mail van John Delaney I understood that the goal of the work is to better understand which factors are important for this kind of modelling work, and also to determine the limits of what the model can do. Still, I found it fascinating to see how far they had gotten.
______________________
* Image courtesy of G. Trumpy and J. Delaney, Scientific Research Department, National Gallery of Art, Washington, D.C.; detail from “Flowers in an Urn” by Jan van Huysum, c. 1720/1722, oil on panel,
79.9 x 60 cm.

Speakers announced for SI/MCI Mechanics of Art Materials event

Arts & Industries Building, Smithsonian Institution

The Museum Conservation Institute in collaboration with the Royal Danish Academy of Fine Arts (KADK) is pleased to announce the speakers for our upcoming event “The Mechanics of Art Materials and its Future in Heritage Science: A Seminar and Symposium,” to be held at the Smithsonian Institution on October 24-25, 2016. This program brings experts in mechanics research from across the globe to discuss current and future trends in the study and preservation of cultural heritage. Speakers will represent a continuum of this research, from its origins to those professionals currently working to shape their field and train future generations of scholars. This special event is designed to honor previous research while encouraging forward thinking through opportunities to meet and hear from scholars at the forefront of innovative mechanics research in the cultural heritage sector.
Day One of the program will feature the popular paint mechanics workshop created and taught by MCI scientist emeritus Marion Mecklenburg, condensed into a single-day seminar. The morning program on Day Two will feature an international group of speakers presenting case studies on the state of mechanics research around the globe, while the afternoon program will feature emerging U.S.-based speakers and their thoughts on the future of the field.  We are excited to announce that the following speakers have been confirmed for Day Two of this event:

  • Cecil Andersen (Royal Danish Academy of Fine Arts) and Laura Fuster-López (Polytechnic University of Valencia)
  • Roman Kozłowski (Jerzy Haber Institute of Catalysis and Surface Chemistry, Polish Academy of Sciences)
  • Stina Ekelund (Netherlands Institute for Scientific Research)
  • Nobuyuki Kamba (Tokyo National Museum)
  • Poul Klenz Larsen (National Museum of Denmark) and Morten Ryhl-Svendsen (Royal Danish Academy of Fine Arts)
  • Michał Lukomski (Getty Conservation Institute)
  • Alice Carver-Kubik (Image Permanence Institute, Rochester Institute of Technology)
  • Ken Shull (Northwestern University/Art Institute of Chicago Center for Scientific Studies in the Arts)
  • Lukasz Bratasz (Institute for the Preservation of Cultural Heritage, Yale University)

This intensive, two-day event will provide attendees with an overview of the behavior of art materials and connect that information directly to the activities of those scholars currently shaping the field of heritage mechanics studies. Day Two presentations will focus on the impact of mechanics research in the cultural heritage sector with talks on topics including risk assessment and collections monitoring, the fiscal impact of changes in collections care, new protocols for transit and storage environments, and the application of mechanics research to decorative and archival collections as well as to materials found in contemporary art. Day Two will conclude with a panel discussion on advancing stakeholder participation in mechanics research and application. A post-event publication will include a historiography of mechanics research at the Smithsonian, the case studies and vision papers prepared by the Day Two speakers, Dr. Mecklenburg’s 1982 unpublished report to the Smithsonian on the mechanical behavior of painting materials, and a bibliography of Smithsonian heritage mechanics publications.
We are anticipating registration for this two-day event to be priced at $50 (to include coffee/tea breaks and lunch on both days. There is no single-day registration option. Schedule and registration for this event will be announced at www.si.edu/mci. If you have any questions, please contact Dawn Rogala, paintings conservator at the Museum Conservation Institute, at RogalaD@si.edu.
This event is designed to engage and inform a broad audience of scholars, students, practitioners, and policy makers. We hope to see you in October!

44th Annual Meeting – Research and Technical Studies, May 17, "Out of the rain: Uncovering artistic process in Gustave Caillebotte’s 'Paris Street; Rainy Day'"

“Paris Street; Rainy Day” 1877

From 2013 to 2014, Kelly Keegan, John Delaney, and Pablo Garcia from the Art Institute of Chicago closely examined Gustave Caillebotte’s 1877 painting, Paris Street; Rainy Day along with multiple preparatory drawings also in the institute’s collection. Kelly Keegan, the assistant paintings conservator at the Art Institute presented their findings Tuesday at AIC’s annual meeting.
The first important revelation came when x-ray and infrared images revealed that the under-drawing outlining the perspective done by Caillebotte extends passed the tacking margins with no interference from the stretcher bars. This led conservators to believe that Caillebotte originally painted Paris Street; Rainy Day un-stretched and tacked to a wall. Okay, so the painting started off its stretcher, but how exactly was the under-drawing constructed?
Study for “Paris Street; Rainy Day” 1877
Study for “Paris Street; Rainy Day”
1877

Caillebotte’s preparatory drawing, Study for “Paris Street; Rainy Day” proved to be an invaluable resource for understanding how the final painting was made. Most viewers of 19th century paintings are aware of the connection between impressionism and photography. It was a widely held belief that many painters traced from photographs, but conservators at the Art Institute were skeptical that Paris Street; Rainy Day was based on a photograph. Photography would have caused lens distortion that should have been visible around the perimeter of the drawing but wasn’t. In addition, the paper was very thick which would have made tracing nearly impossible.
Could Caillebotte have projected the city scene onto his paper to create the drawing? A camera obscura is the projection device most well known to art historians and conservators, but this too would have caused lens distortions and bowing edges. Conservators did some digging and eventually discovered the camera lucida. At this point in the lecture, Kelly Keegan played us a video of Pable Garcia, the Assistant Professor of Contemporary Practices at the School of the Art Institute of Chicago. The video showed Garcia in Paris standing in the exact intersection Paris Street; Rainy Day was based on. He explained that a camera lucida is made of a small prism connected to a rod that was most likely attached to a portable table. When someone looks through the prism, a ghost image of the scene in front of the view is projected onto the page. Garcia used his own camera lucida to reconstruct Caillebotte’s drawing exactly.
NeoLucida - modern version of a camera lucida
NeoLucida – modern version of a camera lucida

 
Garcia brought his version back to the lab where he worked with the research team to figure out the next steps in reconstructing this 9-foot wide masterpiece. The painting was about seven times the scale of Caillebotte’s original drawing. Conservators noticed small indentations on the horizon where the vanishing points would be, and pinholes were visible in the infared image denoting where he could have placed tacks. They guessed that Caillebotte probably used calipers or a proportional compass to scale up his drawing. Garcia and the team tacked a large, primed canvas to the wall, and got to work reconstructing Paris Street; Rainy Day from his own drawing.
Kelly Keegan gave a great talk presenting how the team uncovered secrets of impressionist painters and reconstructed Caillebotte’s painting accurately. A much more detailed account of the analysis can be found on the art institute’s website. I also highly recommend checking out Garcia’s website where him and a other professors sell a contemporary version of the cameral lucida which I plan on getting as soon as I submit this blog post.